
EDIT AND FORMAT SLIDES
Arrange Objects on a Slide
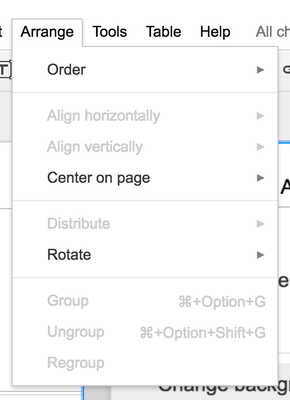
If you’d like to change the way objects are arranged on a slide, select an object or multiple objects. Then, go to the Arrange menu and choose from the following options:
- Select an option from the Order menu to create overlapping effects with the text and objects in your slides. This will rearrange your overlapping text and objects in the order you choose.
- After selecting multiple objects, you can align them in a several ways by selecting an option from the Align horizontallyor Align vertically menus.
- Go to the Center on slide menu to place your object(s) at the horizontal or vertical center of your slide.
- Use the Rotate menu to flip your object(s) horizontally and vertically.
- If you've selected three or more objects, you can evenly distribute the space between them horizontally or vertically by selecting the applicable Distribute option.
- Select Group or Ungroup to group multiple objects together. This makes it easier to format or move them around as a single unit.
- Note: Every option in the Arrange menu is also available when right-clicking on an object. To move and resize multiple objects at the same time, hold down the Shift key while you click each object, or drag over all of the objects you'd like to select. If an object has already been selected, holding the Shift key while clicking an object will deselect it.
Snap to Grid
Snap to grid allows you to easily auto-align text, images, shapes, and tables. Snap to Guides is enabled by default. You can enable or disable the Snap to Grid and Snap to Guides options under the View menu.
If you have the Snap to Guides option disabled, you can also use the following keyboard commands to modify the way you work with objects on a slide:
If you have the Snap to Guides option disabled, you can also use the following keyboard commands to modify the way you work with objects on a slide:
- To turn off the grid to smoothly drag-and-drop your object, hold the Alt key while dragging an object.
- To create a duplicate of an object while leaving the original in place, hold the Ctrl key while moving an object.
Insert an Image or Video into a Slide
Images
Images are a good way to make your presentations more colorful. Here are six ways to insert an image into your presentation:
Inserted images must be in .PNG, .JPEG or .GIF (no animated GIFs) file formats. They can have a maximum of 2000 pixels in dimension and a maximum of 2MB in size.
Here’s how to insert an image in your presentation:
Videos
You can add a video from YouTube into your presentation. Here’s how:
Images are a good way to make your presentations more colorful. Here are six ways to insert an image into your presentation:
- Drag-and-drop an image from your computer directly into a slide.
- Drag an image from the web directly into your presentation.
- Upload an image that’s saved to your computer. Enter the URL of a publicly available image from the Internet.
- Find an image through Google Image Search.
- Choose an image that’s in one of your Picasa Web Albums.
- Browse Stock photos and select an image.
Inserted images must be in .PNG, .JPEG or .GIF (no animated GIFs) file formats. They can have a maximum of 2000 pixels in dimension and a maximum of 2MB in size.
Here’s how to insert an image in your presentation:
- Click the Insert image icon in your presentation toolbar, to the right of the T text icon. Alternatively, you can go to theInsert menu, and select Image.
- Choose one of the four options to insert an image, and choose a file, enter a URL, or do a search.
- Once you’ve selected an image, click Upload or Select.
- The image will be inserted into the selected slide.
Videos
You can add a video from YouTube into your presentation. Here’s how:
- Go to the Insert menu and select Video.
- Then, search for a video you'd like to insert or enter a URL from YouTube.
- After you've selected a video, check the box next to the video's thumbnail and click Insert Video.
- The video will appear in your presentation. Once you’ve started playing a video, you can maximize it to the full size of a slide by clicking the full screen icon at the bottom right of the video. You can resize, move, and arrange the video much as you would any other slide object.
Insert, Format, and Edit Tables in a Slide
To add a table to a slide in your presentation, follow these steps:
Add rows and columns
Format the table
To change the background color of a table or a cell range within a table, select a range of cells. Then, click the Fill color icon (paint bucket icon), and select a color.
You can also change cell border color and thickness for the entire table, a cell range within the table, or an individual cell. Here’s how:
To resize a table, point your mouse to any of the four corners of the table. When the mouse pointer becomes an arrow, you can resize by dragging inward or outward.
Here’s how to resize an individual row or column:
- Select a slide.
- Go to the Table menu, and select Insert table.
- Select the dimensions for your table.
Add rows and columns
- Click inside the table to select a cell or row.
- Go to the Table menu and select from the following options:
- Insert row above the selected cell/row
- Insert row below the selected cell/row
- Insert column to the right of the selected cell/column
- Insert column to the left of the selected cell/column
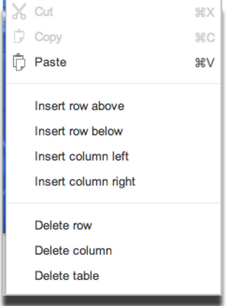
- Or, right click a cell or cell range to access a menu that lets you to insert or delete rows and columns. You can also add rows to the table by selecting the cell in the bottom right corner and pressing Tab.
Format the table
To change the background color of a table or a cell range within a table, select a range of cells. Then, click the Fill color icon (paint bucket icon), and select a color.
You can also change cell border color and thickness for the entire table, a cell range within the table, or an individual cell. Here’s how:
- Select the cell or cell range that you’d like to edit.
- Then, click on the blue triangle in the upper right of the cell or cell range.
- Choose one of the nine options to format the borders from the drop-down menu.
- After you select an option, the selected cell borders will be highlighted. Then, you can format the cell borders using the Line weight, Line dash or Line decorations options under the Format menu.
To resize a table, point your mouse to any of the four corners of the table. When the mouse pointer becomes an arrow, you can resize by dragging inward or outward.
Here’s how to resize an individual row or column:
- After inserting a table into a slide, point your mouse to any of the inner borders of a cell. The mouse pointer becomes a two-sided arrow.
- Drag the arrow to resize a column or row.
- Highlight the cells you’d like to merge.
- Go to the Table menu and select Merge cells.
- To unmerge cells, highlight the cell and select Unmerge cells from the Table menu.
Insert Word Art into a Slide
Word art lets you add flair to text and headings in a slide. Keep in mind that it’s only available in the new version of Google presentations.
Here’s how to insert word art into a slide:
Here’s how to insert word art into a slide:
- Go to the Insert menu and select Word Art.
- You’ll be prompted to enter text to display. Type in the text, using Shift + Enter to include multiple lines of text.
- Click Enter to save.
